- Published on
How to code a custom bluesky feed?
- Authors

- Name
- Benjamin Lesné
- @LesneBenjamin
Introduction
I found the feed builders a bit limited so I wanted to build my own. I managed to find a Feed Generator template but was completely lost in the code. This is why I decided to make my own from scratch!
TL;DR
The repo is here, read the readme to launch your feed asap.
We are building this:
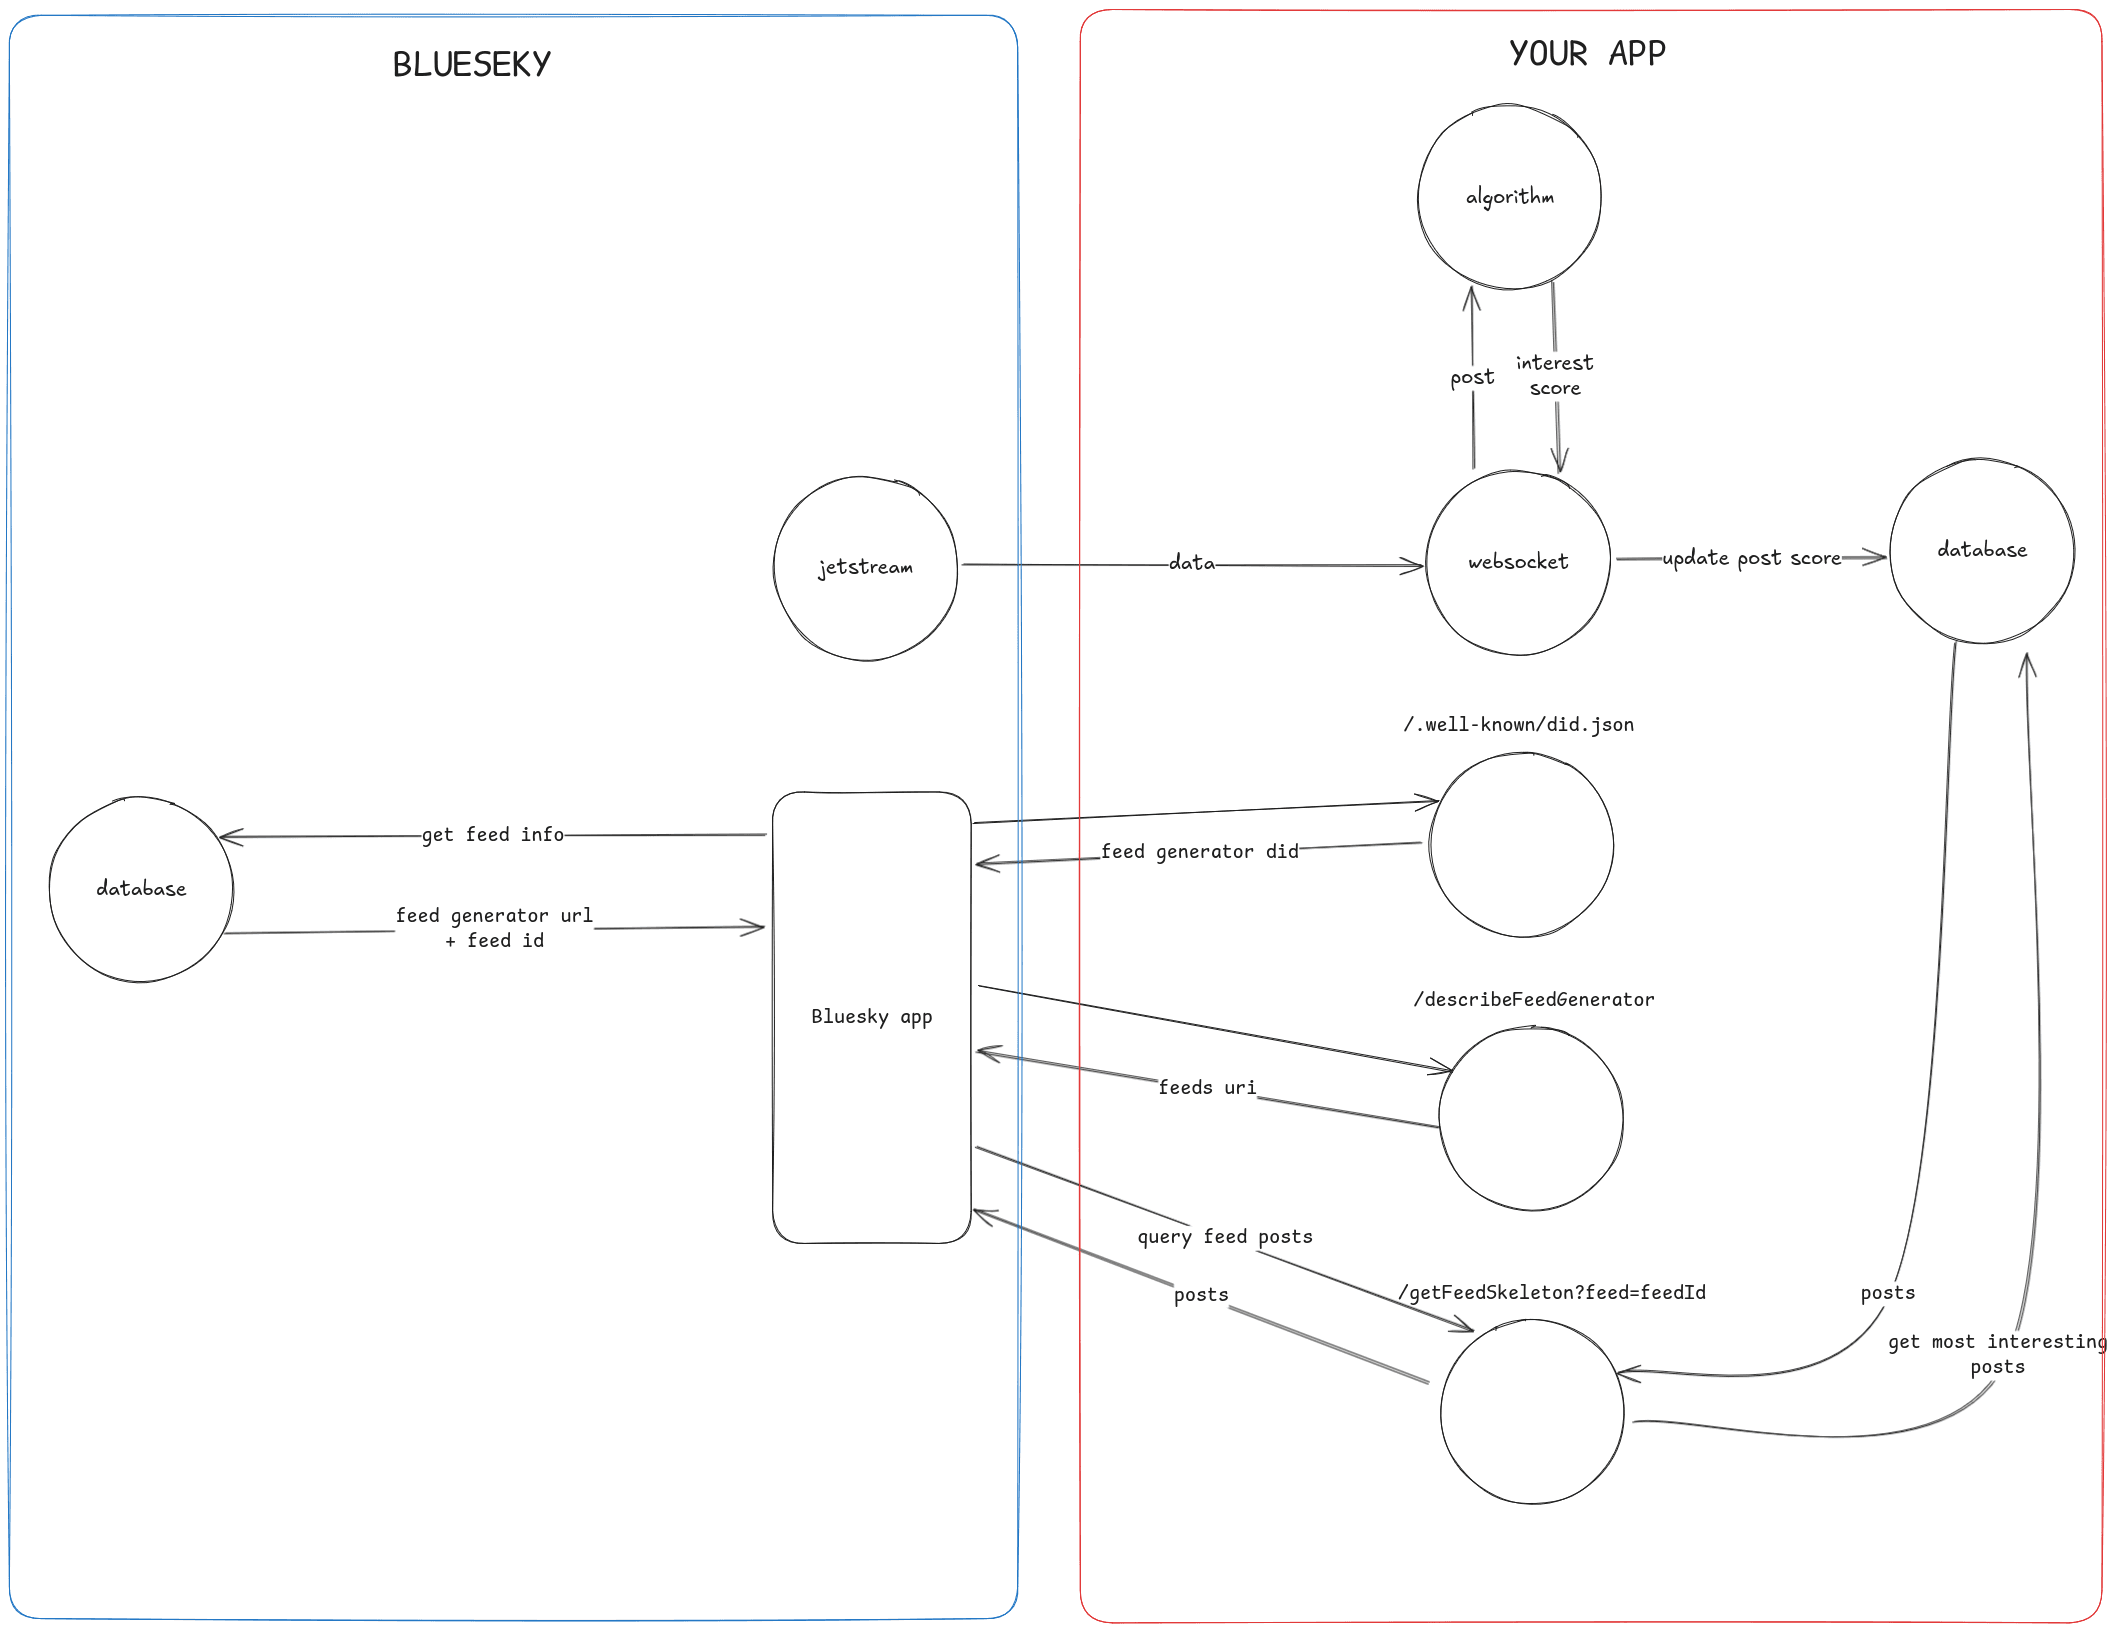
Setup the repository
- Create a directory then initialize npm and git:
mkdir my-custom-feed &&
cd my-custom-feed &&
npm init es6 -y &&
git init
- In your root directory, create a
.gitignorefile with the following content:
# dependencies
/node_modules

# env
.env
.env*.local

# database
local.db*
- In your root, create a
tsconfig.jsonfile with this content:
{
  "compilerOptions": {
    "lib": ["es2022"],
    "module": "node16",
    "target": "es2022",
    "moduleResolution": "node16",
    "removeComments": true,
    "esModuleInterop": true,
    "skipLibCheck": true,
    "allowJs": true,
    "resolveJsonModule": true,
    "isolatedModules": true,
    "noImplicitAny": true,
    "strict": true,
    "noUncheckedIndexedAccess": true,
    "checkJs": true
  },
  "include": [".eslintrc.cjs", "**/*.ts", "**/*.cjs", "**/*.js"],
  "exclude": ["node_modules"]
}
- Create the entry point of your app in the src directory and log out Hello world
mkdir src && echo 'console.log("hello world");' > src/server.ts
- Install typescript, tsx to run the server.ts file and nodes types
npm install --save-dev typescript tsx @types/node
- You should see "hello world" in the terminal when starting the server:
npx tsx watch ./src/server.ts
Connect to the jetstream
Now, we need data. Let's connect to bluesky's jetstreams to get the newly created posts, likes, and more.
- To connect to a jetstream, install @skyware/jetstream and ws:
npm install @skyware/jetstream ws &&
npm install --save-dev @types/ws
- create a jetstream.ts file with the following content in the src directory:
import { Jetstream } from '@skyware/jetstream'
import WebSocket from 'ws'

export const jetstream = new Jetstream({
  wantedCollections: ['app.bsky.feed.post'],
  ws: WebSocket,
})

jetstream.onCreate('app.bsky.feed.post', (event) => {
  console.log(event.commit.record)
})
- Now, start the jetstream in your
server.ts(be ready to stop your server this is going to spam logs):
import { jetstream } from './jetstream.js'

jetstream.start()
You should have crazy amount of logs poping in your terminal when running the server now. Good job, you succesffully connected to the jetstream 👍
You can stop the server for now (CTRL + C). Now that we have the data, we need to store only the relevant posts in our database.
Setup the database
We will use Drizzle and SQLite (see drizzle doc for sqlite) but you can use whatever database you'd like.
- Install the dependencies
npm i drizzle-orm @libsql/client dotenv
npm i -D drizzle-kit
- Create the src/database directory and an empty schemas.ts file inside it by running the following command in your root:
mkdir src/database && touch src/database/schemas.ts
- Add this to the schema.ts file:
import { int, sqliteTable, text } from 'drizzle-orm/sqlite-core'

export const postsTable = sqliteTable('posts', {
  id: int().primaryKey({ autoIncrement: true }),
  uri: text().notNull().unique(),
  interestScore: int().notNull(),
  createdAt: int({ mode: 'timestamp' }),
})
- create a .env file in your root directory and add this DATABASE_URL variable:
touch .env &&
echo "DATABASE_URL=file:src/database/local.db" >> .env
- load the env variable with dotenv in your server.ts file by adding this import at the top of the file:
import 'dotenv/config'
- Create a
drizzle.config.tsfile in the root of your project and add the following content:
import { defineConfig } from 'drizzle-kit'

export default defineConfig({
  out: './drizzle',
  schema: './src/database/schemas.ts',
  dialect: 'sqlite',
  dbCredentials: {
    url: process.env.DATABASE_URL as string,
  },
})
- create a
database.tsfile in src/database directory and add the following content:
import { createClient } from '@libsql/client'
import { drizzle } from 'drizzle-orm/libsql'

const client = createClient({
  url: process.env.DATABASE_URL as string,
})

await client.execute('PRAGMA journal_mode = WAL')

export const db = drizzle(client)
Why do we enable WAL? (click this text to see)
By default, SQLite operates in a mode that locks the database during write operations, preventing simultaneous reads and writes. For example, if someone requests the feed while a new post is being written, the feed request would be blocked until the write operation finishes.
Enabling WAL (Write-Ahead Logging) mode solves this by allowing concurrent reads and writes, ensuring smoother performance and better user experience.
- Now generate your local.db file by applying the post schema:
npx drizzle-kit push
Now we can add posts for our feed to the database. But first, we need an algorithm to decide if we should store or not the post.
Algorithm
What we look for is posts talking about javascript and with embedded content (image, video, links, etc.). Also, we don't want NSFW labels (see doc for more).
- In your jetstream.ts file, add the following function:
import type { CommitCreate } from '@skyware/jetstream'
// ...rest of the imports

const BLOCK_LIST = ['check doc for NSFW labels', 'label2', 'label3']
const ALLOWED_REGEX = /\bjavascript\b/i

type StandardAlgoArgs = {
  record: CommitCreate<'app.bsky.feed.post'>['record']
}
export function standardAlgo({ record }: StandardAlgoArgs) {
  let score = 0
  let denied = false

  switch (record.$type) {
    case 'app.bsky.feed.post': {
      record.labels?.values.forEach((value) => {
        if (BLOCK_LIST.includes(value.val)) {
          denied = true
        }
      })

      if (denied) {
        return 0
      }

      const isAboutWebdev = ALLOWED_REGEX.test(record.text)
      if (isAboutWebdev) {
        score = score + 1

        if (record.embed) {
          score = score + 1
        }
      }

      break
    }

    default:
      break
  }

  return score
}

// ... rest of the code
- Now, use the standardAlgo function to decide if we store the received post to the database:
import { db } from './database/database.js'
import { postsTable } from './database/schemas.js'
// ... rest of the imports

// ...

jetstream.onCreate('app.bsky.feed.post', async (event) => {
  const record = event.commit.record
  const interestScore = standardAlgo({ record })

  if (interestScore > 0) {
    const did = event.did
    const recordKey = event.commit.rkey

    await db.insert(postsTable).values({
      interestScore,
      uri: `at://${did}/app.bsky.feed.post/${recordKey}`,
    })
  }
})
Your jetstream.ts file should look like this now (click to see):
import { db } from './database/database.js'
import { postsTable } from './database/schemas.js'
import type { CommitCreate } from '@skyware/jetstream'
import { Jetstream } from '@skyware/jetstream'
import WebSocket from 'ws'

const BLOCK_LIST = ['check doc for NSFW labels', 'label2', 'label3']
const ALLOWED_REGEX = /\bjavascript\b/i

type StandardAlgoArgs = {
  record: CommitCreate<'app.bsky.feed.post'>['record']
}
export function standardAlgo({ record }: StandardAlgoArgs) {
  let score = 0
  let denied = false

  switch (record.$type) {
    case 'app.bsky.feed.post': {
      record.labels?.values.forEach((value) => {
        if (BLOCK_LIST.includes(value.val)) {
          denied = true
        }
      })

      if (denied) {
        return 0
      }

      const isAboutWebdev = ALLOWED_REGEX.test(record.text)
      if (isAboutWebdev) {
        score = score + 1

        if (record.embed) {
          score = score + 1
        }
      }

      break
    }

    default:
      break
  }

  return score
}

export const jetstream = new Jetstream({
  wantedCollections: ['app.bsky.feed.post'],
  ws: WebSocket,
})

jetstream.onCreate('app.bsky.feed.post', async (event) => {
  const record = event.commit.record
  const interestScore = standardAlgo({ record })

  if (interestScore > 0) {
    const did = event.did
    const recordKey = event.commit.rkey

    await db.insert(postsTable).values({
      interestScore,
      uri: `at://${did}/app.bsky.feed.post/${recordKey}`,
    })

    console.log('added post to db!')
  }
})
If not already done, start your server:
npx tsx watch ./src/server.ts
And add in your package.json the following scripts:
{
  // ...
  "scripts": {
    "dev": "tsx watch ./src/server.ts",
    "start": "tsx ./src/server.ts",
    "test": ""
  }
  // ...
}
Currently our database is getting filled with posts. Now we would like to return our posts when requested, let's make our api!
API
/xrpc/app.bsky.feed.getFeedSkeleton
Bluesky is going to hit the endpoint /xrpc/app.bsky.feed.getFeedSkeleton to retrieve the feed's posts. Let's make the endpoint with express.
- install express
npm install express &&
npm install --save-dev @types/express
- In server.ts, create the endpoint and return the last 10 posts:
// ...rest of the imports
import express from 'express'
import { db } from './database/database.js'
import { postsTable } from './database/schemas.js'
import { desc } from 'drizzle-orm'

// ...rest of the code

const app = express()

app.get('/xrpc/app.bsky.feed.getFeedSkeleton', async (req, res) => {
  const feed = await db
    .select({
      post: postsTable.uri,
    })
    .from(postsTable)
    .orderBy(desc(postsTable.interestScore))
    .limit(10)

  res.json({
    feed,
  })
})

app.listen(3000, () => {
  console.log(`Feed app listening on port 3000`)
})
When running tsx server.ts, you should be able to get your posts at http://localhost:3000/xrpc/app.bsky.feed.getFeedSkeleton
Bluesky also need to make sure the feed requested is ours. To do so, bluesky hit two endpoints, let's make them! But first we need your handle and did.
Get your handle
Browse to https://bsky.app
Click on
profilein the left navigationGrab the handle
On the page, below your username, your handle should be displayed, it looks like this:
@johndoe.bsky.social
or in the url of the page:
https:/profile/johndoe.bsky.social
Copy the "johndoe" part of it.
Also keep the handle near by, we will use it to later to publish the feed
Get your did
Paste the "johndoe" of your handle on this website
click
get my did
It should display on the screen your did, it looks like this:
did:plc:biu6j0lqrtpjfazvekg6zrah
- add the did to your .env
echo "PUBLISHER_DID='YOUR_DID'" >> .env
Setup the required variables
We will have to provide info about the feed. To make things easier let's create two object to represent the feed generator and our feed.
"Feed generator? What is that?" (click this text to know more)
The way it works is that a feed generator provide access to one or more feeds. This feed generator is convenient because bluesky now can just hit your feed generator endpoint and target the specific feed in one go:
/xrpc/app.bsky.feed.getFeedSkeleton?feed=web-dev
Since we only have one feed we don't bother to handle the feed param in the code.
- Create a src/constants.ts file and add the following content:
export const FEED_GENERATOR = {
  did: 'did:web:' + (process.env.HOSTNAME as string),
  endpoint: `https://${process.env.HOSTNAME as string}`,
} as const

export const WEB_DEV_FEED = {
  name: 'My feed name displayed to users',
  description: 'This is my feed description that is visible in Bluesky',
  rkey: 'web-dev',
} as const
The only value you can't change here is the dids (unless you know what you are doing)
- add a dummy
HOSTNAMEto your .env for now:
echo "HOSTNAME='my-hostname.com'" >> .env
Create routes to get identified by Bluesky
- add the following to your
server.tsfile:
This allow bluesky to understand that we have a feed generator and that this feed generator provide one feed
// ...rest of the imports
import { WEB_DEV_FEED, FEED_GENERATOR } from './contants.js'

// ...

app.get('/.well-known/did.json', (req, res) => {
  res.json({
    '@context': ['https://www.w3.org/ns/did/v1'],
    id: FEED_GENERATOR.did,
    service: [
      {
        id: '#bsky_fg',
        serviceEndpoint: FEED_GENERATOR.endpoint
        type: 'BskyFeedGenerator',
      },
    ],
  })
})

app.get('/xrpc/app.bsky.feed.describeFeedGenerator', (req, res) => {
  res.json({
    did: FEED_GENERATOR.did,
    feeds: [
      {
        uri: `at://${process.env.PUBLISHER_DID as string}/app.bsky.feed.generator/${
          WEB_DEV_FEED.rkey
        }`,
      },
    ],
  })
})

// ...
- In your root, create a github public repository for your feed
Using the github cli:
gh repo create
? What would you like to do? Push an existing local repository to GitHub Path to local repository .
? Repository name your_feed_name
? Repository owner your_github_account
? Description /
? Visibility Public
? Add a remote? Yes
? What should the new remote be called? origin
? Would you like to push commits from the current branch to "origin"? Yes
You can also create it through the github interface here
Great, now our feed has a public repository and can be identified by Bluesky but it is not accessible on the web. Time to deploy our app to a VPS!
Deploy to a VPS
Disclaimer: we do not take care of the security in this post. Concerned about security? Setup Coolify with CJ here, he seems to know what he is doing not like me :)
FYI: The default endpoint for jetstream is located "us-east" (see repo), make sure to get your server nearby to reduce response times.
To make the feed work, we need to access it through https. To do so, we need a domain name.
Domain name
- buy a domain name at namecheap
I bought webdevfeed.online for 1,11€/year
Hosting provider
Make sure the localisation is right on the top right of the page, creating an account on the US website and ordering on the british one won't work
You should get into a form asking:
"Configure your Virtual Private Server Instance"
=> Grab the VLE-2 (the lowest spec)"Choose your images"
I chose Ubuntu
- "Keep or modify your datacenter localization and quantity"
I picked North America since the jetstream servers are there
- Now time to pay 🤑
After paying, you should get an email within 20 minutes with your credentials to connect to your server, let's connect through ssh and install Coolify!
Setup Coolify
- ssh to your server
ssh YOUR_USERNAME@YOUR_VPS_IP_ADDRESS
You will find the username, ip address and password in the OVH email sent after the VPS has been installed.
- Install coolify by running on your VPS:
curl -fsSL https://cdn.coollabs.io/coolify/install.sh | bash
To fix "Please run this script as root or with sudo" click this text
You probably don't have a root password yet, let's set one:
sudo passwd root
- Become root:
su - root
- Now try again to install Coolify
To fix "Please install Docker manually" click this text
Follow the installation steps from here and try again to install Coolify
After installing coolify, the dashboard should be accessble at: http://your.vps.ip.address:8000
Go to http://your.vps.ip.address:8000 and create your coolify account
Go through the onboarding
Choose localhost for the server
Create your first project
You should end up in your Coolify dashboard at projects > New ressource
In our case, we select public repository
Paste the https url to your repository
Example:
https:/BenjaminLesne/custom-feed-template.git
Where to find this url?
- go to your github repositories
- go to your repository
- click on the green button "code"
- click on HTTPS
- copy the url
click check repository
click continue
Update the "Domains" field with the domain name you bought (use https!)
https:
- add this as a "Post-deployment" command:
npx drizzle-kit push
Don't forget to save!
- Go to environment variables and add the following:
DATABASE_URL="file:src/database/local.db"
PUBLISHER_DID="did:plc:your_did"
HOSTNAME="your_domaine.com"
- Sync your VPS ip address with your domain name
Connect to your namecheap account
Go to your domain list
Click "manage" next to your domain name
Click Advanced DNS
Add two new host records:
5-1. type: A Record, host:*, value: YOUR_VPS_IP_ADDRESS, TTL: automatic
5-2. type: A Record, host:@, value: YOUR_VPS_IP_ADDRESS, TTL: automatic
see namecheap documentation for more info. If you can't update Hosts records from the advanced tab, you might have a suspended account
- click deploy at the top right
Let's publish our feed while the deployment is running!
Publish the feed
- On your local repository, install the following dependencies
npm install @atproto/api
- create a
scripts/publishFeedGen.tsfile with the following content:
import 'dotenv/config'
import { AtpAgent, BlobRef } from '@atproto/api'
import fs from 'fs/promises'
import { FEED_GENERATOR, WEB_DEV_FEED } from '../src/constants.js'

const run = async () => {
  const handle = 'johndoe.bsky.social'
  const avatar = undefined as string | undefined

  const agent = new AtpAgent({
    service: 'https://bsky.social',
  })

  await agent.login({ identifier: handle, password: process.env.APP_PASSWORD as string })

  let avatarRef: BlobRef | undefined
  if (avatar) {
    let encoding: string
    if (avatar.endsWith('png')) {
      encoding = 'image/png'
    } else if (avatar.endsWith('jpg') || avatar.endsWith('jpeg')) {
      encoding = 'image/jpeg'
    } else {
      throw new Error('expected png or jpeg')
    }
    const img = await fs.readFile(avatar)
    const blobRes = await agent.api.com.atproto.repo.uploadBlob(img, {
      encoding,
    })
    avatarRef = blobRes.data.blob
  }

  const data = {
    repo: agent.session?.did ?? handle,
    collection: 'app.bsky.feed.generator',
    rkey: WEB_DEV_FEED.rkey,
    record: {
      did: FEED_GENERATOR.did,
      displayName: WEB_DEV_FEED.name,
      description: WEB_DEV_FEED.description,
      avatar: avatarRef,
      createdAt: new Date().toISOString(),
    },
  }

  await agent.api.com.atproto.repo.putRecord(data)

  console.log('All done 🎉')
}

run()
Provide your handle as a value for the handle variable line 6
Optionnally, provide a local path to an image to the avatar variable line 7
Create a new App password
add the password to your .env
echo "APP_PASSWORD=YOUR_APP_PASSWORD" >> .env
- update your HOSTNAME env variable with your domain name
HOSTANME='example.com'
- Update your feed name to own
In constants.ts, update the name key from the WEB_DEV_FEED variable
- Publish your feed with:
npx tsx ./scripts/publishFeedGen.ts
You should see 'All done 🎉' in your terminal when this is done.
Verify everything is working
Go on Blueksy > Feeds
In the "Discover New Feeds" search input, type the value of the
WEB_DEV_FEED.namevariable from yoursrc/constants.ts
Your feed should show up in the results. Click on it, posts from your feed should show up. It might take few minutes before a post gets added to your database. Congrats you have your own feed now!
Troubleshooting
- could not resolve identity: did:web:your-website.com
(source code throwing this error)
Did you add a HOSTNAME in your env variables without "https://" ?
Invalid app.bsky.feed.generator record: Record/did must be a valid did
Make sure there is no "http(s)://" in the did
invalid feed generator service details in did document: did:web:api.webdevfeed.online
(source code throwing this error)
Make sure your hostname is right (without "https://") and make sure you did not publish the wrong hostname to bluesky!
How to debug?
The doc doesn't help much so what you have to do is paste the error message in github between "quotes", find the file from the atproto repo throwing that error message then try to understand the code... good luck!